Great work!


Great work!

This would be a start.")


Wow...it's been quite a while since I rebuilt a Quadrajet. Brings back found memories...fun stuff!


Very cool jeep. I'm really digging the plaid interior, but I bet that's a bit of a polarizing design choice by the previous owner.
Do the wagons run the spicer 18 transfercase? Maybe once you get a chance to cruise around in it a bit you might find all it needs is a saturn overdrive. The whole tractor-shift situation would really up your jeep-cred, even though it's kinda the complete opposite of what you were thinking with an automatic swap.
But then again....4 shift levers.... everything's better with more shift levers.

___________
James Orofino
1970 CJ5
1958 Willys Wagon
Been doing some cooling system work....the old radiator was too wide and even though it was mounted back from the grill to fit, it was still too far away from the fan, had leaks, and was poorly mounted. After fighting getting good radiator work done on the cj5, I just went ahead and bought a new aluminum one from Champion. The radiator does fit in the oem location forward against the grill, but decided to start with the radiator mounted back one inch..this brings the radiator closer to the fan as well as provides clearance for the lower radiator inlet hose to squeeze past the battery try (which is not oem due to engine swap). I put in metal spacers on the mounts, and I also added a spacer behind the fan to push it forward (as long as it doesn't hit the cross-member). This reduces the gap between the fan and radiator to a bit better distance. I still need to get a shroud built, and then maybe I can move the radiator forward to the oem mounting location and modify the battery tray then. Figure this is worth a shot as it doesn't require too much work. I have checked the fan clearance quite a bit and am comfortable with including the one inch spacer...
While at this all hoses were replaced which is kind of fun when trying to buy for a one off application. I got the heater valve cleaned up and included it in the hose routing...it had been skipped, but now I need to clean up the pull cable as its frozen up. edit: after testing this out a bit, I found the heater shut off valve is leaking out the top plunger, and thus the reason it was originally bypassed. I bypassed again, and trying to determine if its even an oem piece and whether I should even replace it. The heater core is external - mounted in the engine bay - so a shut-off is not really necessary, and the cj never had one from the factory with the similar external heater core.
I also changed the manifold inlet to allow for better heater hose routing.
Initial test this evening suggests it may work....but not convinced yet as it wasn't really that hot. I do think a shroud will help if I can get one built. Or if nothing else, if I replace the old school generator with an alternator that can handle a bit more electrical load, i might just mount an electric fan on the radiator - Champion sells one specifically for this radiator.
___________
James Orofino
1970 CJ5
1958 Willys Wagon
Oh, and guess I never mentioned this...had a bit of an electrical issue so had the generator and voltage regulator checked out and cleaned up. I do want to eventually replace these with a 3 wire 10si alternator, but the wiring right now is a complete mess so not sure. Just trying to get it running a bit, then maybe try to work on that over time. I would recommend the old school generator/starter/alternator shop i took it to...D and D Auto Electric....

___________
James Orofino
1970 CJ5
1958 Willys Wagon
Doing this a bit out of order - didn't realize I hadn't updated this since the start of the carb rebuild...
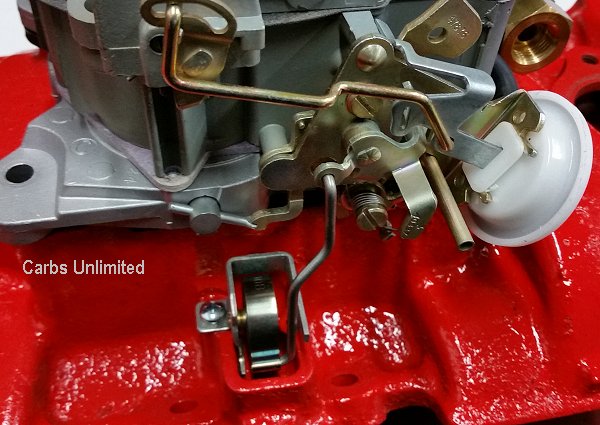
When trying to tune the quadrajet and realized I am missing a rod that goes from the thermal coil to the choke...
should look like this:
in other words, the choke has not been closed when trying to start with only flooring gas pedal (I really prefer manual choke), which makes it a bit easier to cold start. Though about just running the manual choke cable to the spot (from the original L6 engine), and activating by hand...but I would have had to remove the the reverse 'L' piece with the tiny notch in the end that locks out the secondary throttle plate from opening until the engine is warm. So I tracked down new parts and go them installed and they seem to be working well...cold start is better with functioning auto choke as well as the thermal rod allows the choke to slowly open and step down the idle from fast to slow as it warms up (with the touch of the gas pedal).
Set cold/fast idle around 1000 and then hot/low idle at 650. From what I have read, the hot idle should be even lower - say closer to 450-500 - but I backed the hot idle screw all the way out and 650 it is. I tried trimming the idle down with the idle mixture screws, but they don't seem to have much affect. Guessing I need to look at the timing a bit more...at least its running with some decent timing advance, but I probably need to get the vac gauge out and really get it dialed in.
___________
James Orofino
1970 CJ5
1958 Willys Wagon

Nice work.
Yep - fan shroud would be needed for the mechanical fan config for city driving. I guess the question is - how much do you wish to change from current generator to alternator. I think I'd put that change as the decider for electric fan or not.
(how much do you wish to keep this original)
The drive side bench seat had a broken seat bracket...
It had been previously worked on with some ugly blobular welds - can't say mine were much better but I did try to get it hot enough to get some more penetration than the previous repair. Also made some progress on getting some 2pt seat belts mounted...I got a pair of YJ rear seat lap belts from Jim (thanks!) and they should work fine for now. Mounted the inside portion of the belts to the seat mount.
The outside portion of the belt was a bit trickier...Especially on the passenger side, the belt cannot just be attached to the seat frame as the entire frame folds/pivots forward for access to the rear seat, and there is no latch holding it down. If the belt was just mounted to the seat frame, then the passenger, seat and belts could all still pivot forward into the dash/windshield. The belt needs to be mounted to a fixed spot on the floor/body to hold it in place.... first thought was to mount them here on both sides....
But after getting some measurements from a friend with a slightly later 62 Willys that came with seat-belts, I decided to put them in the floorboard behind the seat pretty close to the oem location on the later Willys. I didn't get a pic of the underside, but I used the large (3" or so) diameter fender washers that were on the rear seat belt mount from my CJ. I kept the inside mounts on the seat mount on the slider track for now even though they could also be drilled through the floor...
Driver side, looking down from the seat back...top of pic is toward the rear seat.
A little better perspective on mount location...this is looking past the outside edge of the driver seat towards the rear.
Allright, after grading 25 physics lab reports, taking care of a RTOC scholarship recommendation, tire rotation and balance, oil change, brake pad replacement on the Tacoma (146k on a single set of pads!) and seat belt mount on the Willys....I am ready for a beer and to grill some steaks and maybe watch just a bit of college football....
___________
James Orofino
1970 CJ5
1958 Willys Wagon
Continuing with engine work...The initial timing was nicely set at about 10 BTDC, and the mechanical advance seems to work with increasing RPM, but the vac advance was not functional. So that started one of those simple repair turns into a big headache kind of projects. It was common for a sbc engine swap into Willys, and one reason is the sbc can be front mounted on the oem L6 engine mounts and then the only things that needs to be changed is the t90 transmission input shaft switched to the short t90 input (from a CJ). No cross-members changes need to be made, or changes to the floorpans for tunnel clearance etc, the transmission and transfer case all stays in the original position which also means the driveshafts and everything else can remain oem. The downside to this swap is the engine ends up a bit pushed rearward in the engine bay - thus the issues with the large fan to radiator spacing that causes some of my cooling issues - as well as chevy's have the rear mounted distributor which has clearance issues with the firewall. In the case of mine, the firewall was cut and notched for distributor clearance. Accessing the distributor and removal is a complete PITA (you have to remove the motor for the wipers, remove the coil from its mount and then generally injure your back to get to it. Here it is without the cap up against the firewall - the coil mounts to the bosses directly in front...
So I pulled the distributor to change the vac advance can, and to see if it was still running points or maybe a magnetic/pertronix style ignition had been installed. Classic large cap HEI has no chance of fitting the small space. Once I pulled the distributor - I realized its kind of different than what I am used to seeing on GM engines. Turns out, the hodgepodge that is my sbc (1957 283 block with early 60's intake and carb, also has a one year only 1955 distributor (from the sbc 265) that was quickly replaced with what most everyone knows as a the common GM sbc distributor. I am not sure why this distributor was used...its possible it was strictly for clearance issues as its a bit smaller than the common distributors that were used for the following 30 years. This distributor does not have the classic points adjustment screw with window in the cap, thus adjusting and measuring dwell with the engine running cannot be done....If must be done manually with a feeler guage with the distributor pulled.
breaker plate with points: pretty standard minus the points adjustment screw through the cap - it must be adjusted using the eccentric screw on the breaker plate:
disassembly usually starts with removal of the drive gear by driving out the roll pin...except on this one someone hammered/pressed over the roll pin ends (or just soldered it?) and thus grinding is needed to remove.
Anyway, figured while I was going to replace the vac can, figured I might as well replace the points to something I never have to deal with again given the difficult access. But finding a pertronix style ignition pick-up for this rare distributor seemed like it might just be easier to replace the entire thing with an aftermarket set-up...Of course, the aftermarket ones are just a bit bigger and don't clear the firewall. So a connection in Montana sent me his small cap Accel solid state distributor which is no longer in production (actually two units that each had issues, but could be combined into one functional unit with a bit of work - disassembly and swap of vac cans mostly).
Anyway - thought I was making progress...go to put the functional (hopefully) accel distributor in, and it won't clear for installation by about 1/2". At this point, I am frustrated enough that I decide I will 'make' it clear - bfh on the firewall, and eventually, just take the cut-off wheel and enlarge the notch. After hours in a back wrenching position trying to cut the notch and not anything else important, I finally got the distributor to fall in place...
The cap and rotor had to be removed to increase the clearance just enough for install. Now I have to get the rotor pointed in the right direction, hope I get the distributor installed with the gear on the right tooth so the timing is right and it will fire up. And maybe, I never have to take that damn thing out again, and then patch up the firewall. I am starting to hate engine swaps....
___________
James Orofino
1970 CJ5
1958 Willys Wagon
So...when trying to button up the distributor install, I found the coil bracket would need a bit of adjustment so the HEI module on the distributor housing would fit. Stupid me, I pulled the distributor for ease of work on the coil bracket, and somehow fumbled one of the mount bolts down into the hole for the distributor shaft....
The bolt could not be seen down on top of the oil pump shaft,
and magnet down in and around didn't seem to find anything either. I got concerned that the bolt got deflected through the shaft opening and under the intake into the V8 valley. So the intake was removed....
no bolt...at least everything looks really clean and suggests this old unknown engine might have been taken care of. Next up is dropping the oil pan, and removal of the oil pump as maybe it slid past the pump shaft and is sitting on top of the pump gears - or maybe it made its way all the way into the oil pan. The adventure continues....
___________
James Orofino
1970 CJ5
1958 Willys Wagon
oil pan removed....found the bolt...
Two of the oil pan bolts already had the hex heads twisted off - both on passenger side. Maybe be fun trying to extract those...There is a lot of oil leaking out somewhere. Those pan bolts might be part of the problem, but feeling like the main seals on front and rear are part of the problem as well...see what I can find out tomorrow and if its possible or a good time to change those now. Guess its good I found the bolt...but now its going to be harder to put it back together than it was to take it apart.
___________
James Orofino
1970 CJ5
1958 Willys Wagon
___________
James Orofino
1970 CJ5
1958 Willys Wagon
24 years since I rebuilt a quadrajet. That makes me feel old.
It took 8 hours, may of the them on my back under the willys and a couple trips to the hardware store, but I got the two broken off oil pan bolts out of the bottom of the block and hopefully retapped the holes successfully. I don't even know why I try using EZ-out or similar extractors - they never work. If the bolt head twists off from seized up threads, then the much smaller EZ-outs will never work. I guess I was hoping the bolts were broken for some other reason...of course I managed to break off the EZ-out in the first one, and broke a good drill bit off in the other. But with persistence and this little tungsten carbide metal shaving/grinding tool on the small rotary tool (dremel type thing) you can get some work done on hardened bits:
I managed to get the holes drilled out. I ended up having to drill out the holes with a 7/32" bit, which I think took some of the thread out as well, but I couldn't get the 1/4-20 tap to clean-up the thread when drilled with the smaller bit. The two 1/4 oil pan bolts thread in smooth and nice now, but they are just a bit loose and I worry about them stripping out when torqued hard. Of course, oil pan doesn't need too much torque and I test them with a spacer to about 15ft-lbs and it seems like they should hold. As the holes are blind I need to find a bottoming tap that will carry a bit more thread deeper in the hole and that may also help with preventing the threads from stripping. Otherwise its drill them completely out, and then tap to a larger size bolt and/or swap in a helicoil.
The two clean and threaded holes here - the two outside holes (these are passenger side):
I also tried to beat the big dent out of the oil pan. The passenger side of the oil pan took a pretty good hit at some point and may have also been dragged over something. I wonder if this event might have been responsible for the broken oil pan bolts and leaky gasket. Anyway, this was not fine body work - just a wood dowel and a big hammer to beat it out. I debated just buying a new oil pan - until I saw the prices. This will work fine for now...just have to decide if I want to repaint it...

James Orofino
___________
James Orofino
1970 CJ5
1958 Willys Wagon
So next question...I got a one piece fel-pro gasket for the oil pan - its kind of a rubber or thick silicon gasket.
I have never used anything like it before (well the little rubber pieces on the intake ends - which many suggest just using a bead of RTV), and wondering what is the best install method. Should I use some sort of gasket tack or sealant or RTV on this thing? I've used plain old black RTV as well as permatex #2 and recently been using Permatex High Tack (the red liquidy stuff with the brush in the can), but that is with traditional paper, cork or hybrid composite of paper etc.
___________
James Orofino
1970 CJ5
1958 Willys Wagon


FINOCJ (October 20th, 2019)


FINOCJ (October 20th, 2019)
 Posting Permissions

 Reply W/Quote