How available are brake parts for this vehicle? Specialty parts shop online or the parts store in town?


How available are brake parts for this vehicle? Specialty parts shop online or the parts store in town?


___________
James Orofino
1970 CJ5
1958 Willys Wagon
Jim (April 12th, 2020)
Welp...I spent the last two day in a futile effort to bleed the brake system...Finally, with some help from my early jeep friends, figure out the issue...I feel like I've bled quite a few drum brakes over the years and never remember having this issue....I have 2 circuit system - one for the front and one for the rear (all brand new that I just built replacing the OEM single circuit system). The driver rear and driver front worked just fine, but both passenger side cylinders would not produce any fluid. I chased the fluid pressure at each fitting right up to the cylinders....but couldn't get it to come out of the cylinders. Finally, at the suggestion of a friend, I put the left rear drum on - I had not done this as the drum is 'inboard' of the wheel hub and is swedged to the hub - and putting the hub on an off of a tapered interference fit axle is not something I wanted to do more than once. But putting the left rear drum on (just enough to fit over the shoes) solved the problem on the rear!
Basially, without the drum over the shoes, the wheel cylinder pistons were moving all the way out taking up all the fluid displacement from the pedal movement. It was kind of humorous watching it move the left rear shoes (against the return springs) while the right rear was totally open (bleed screw pulled)? Seems like the open path would be preferred - I guess I don't know what the plumbing inside the wheel cylinder looks like, but its hard to imagine it could create enough backpressure when open to force the shoes on the other side to open against the springs. Anyway, with the rear good....
Time to solve the front right issue. In this case, both drums had been on fronts as you have to pull the wheel bearing and hub along with drum...I put them back on after repacking the wheel bearing and learning how the manual shoe adjustment cams worked - I never bent the lockwasher oveer the outer spindle nut so it would be pretty easy to get them off if needed. In this case, the it wasn't just the absence of the drums, but rather shoes were not adjusted to be close enough to the drums and were again just moving in and out taking up all the fluid displacement...so I adjusted the shoes to be out just against the drum on both sides - everything bled correctly. I am still completely surprised that an open wheel cylinder bleed valve is not the path of least resistance...but...I've spent some time around old jeeps, but still lots to learn. I know a lot of people have never work on drum brakes, but working on manual adjustment inboard drum brakes is even all new to me...lots to learn about on old iron...and now I need to spend a few days in detox as I have absorbed enough brake fluid and brake cleaner through my skin and lungs...maybe it will be back on the road one of these days....
___________
James Orofino
1970 CJ5
1958 Willys Wagon
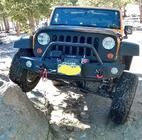
picked up some wheels for it cheap (at least I thought so on CL - $120)...They are 15x8 (3.5" BS) but just couldn't find 16x7 anywhere near my current budget (or even 15x7 that I liked), and if I ever go that route, figure I can sell these for $100 without too much issue. Add the additional price of new tires, and the $900-$1000 final cost was just not in my budget range right now. And I do really like this wheel - its identical to the ones I ran on my cj7 20 years ago. I was hoping when I originally chatted with the seller than the tires might be usable for at least a bit, but 2 were mis-matched 235/75 and kind of junk, and the 2 on the rear are barely used 30x9.5, but they've been sitting out somewhere and are cracking and would only realistically work for little local putting around. I threw the 30s on the rear to see how they fit and how they looked...seems pretty good to me - front is still on jack stands so it might loose a bit of clearance when its dropped.
Was worried the 9.5" width might be too wide, but it just fits...not sure if it would hit at full stuff or not, but I think it might tuck in?
The question is still what to do about tires - obviously I need something to drive on. Might consider picking up a set of used 235/75 Yokohama ATS ($300 mounted and balanced) as a temp solution or buying new (more like $500 mounted and lifetime balanced). For $200 I think I'd normally go new...but part of this wheel purchase was to get it back out on the road while figure out what comes next (both budget and project)...Ideally, still hoping for some 16x7 with 215/85 or 235/85, but that might require replacing the sagging leafs etc and is a lot of money. I will say, I am liking the look enough on the rear to maybe just buy new, and run it as is for a while...next up on the list will be the electric wiper motor and taking care of some electrical wiring (maybe an ignition relayed fuse box). Budget might drive this decision more than anything, and the desire to have it driveable....
___________
James Orofino
1970 CJ5
1958 Willys Wagon
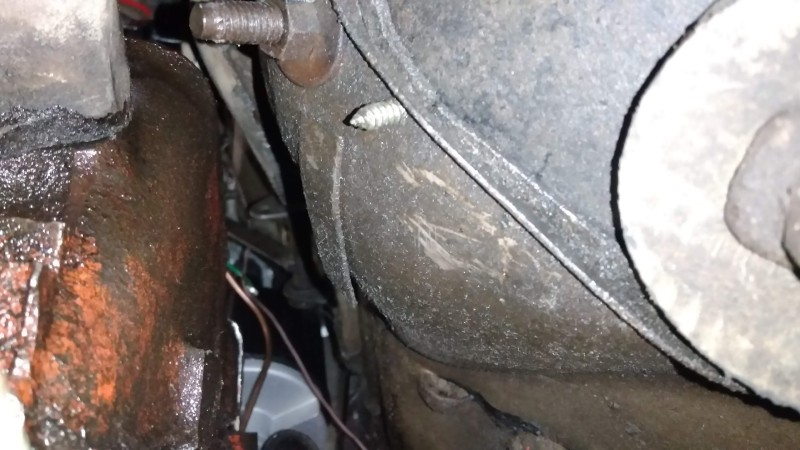
Working on putting stuff back together...I pulled the radiator to do the brake line work, as well as work on the radiator shroud (or whatever you want to call it - maybe more of a fan protector) and the positioning of the radiator. One of the issues has been the battery tray, which has been re-located to the right front inner fender as part of the sbc swap, blocks the output radiator hose on that side. The tray is mounted with two bolts to the inner fender, and has a support leg underneath that was welded to the frame that is the problem. Although this pic doesn't quite do it justice, the leg blocks about 1/4 or so of the hose outlet.
My thought is just to cut and move the support leg over toward the passenger side - and that is definitely doable, although it will pinch the fresh air inlet hose (when i get one) just a bit....no big deal. I am concerned that is mounted both to the body and frame...but that is how its been and I don't see any way. If mount only to the fender - battery and tray are heavy, and no easy way to re-enforce the body mounting. And no obvious way to only mount to the frame with the body still on....here is the mount location: 2 holes in the fender and you can see the front cross member is the basal leg support:
So I cut off the batter tray leg support at the frame and gave it a needed a bit of cleanup and paint. I also made a top half 'hold-down' that will go with it. Up till now the battery has been classically bungee corded in place. This will be way more solid with some threaded hook rods and wing nuts...I made it using only pieces of scrap I had sitting around so its bit goofy but I avoided C19 infection. My welds are not pretty, but they are better than whoever made the bottom tray!...
Battery tray and radiator back in - modified the base leg support (aka bent it inward) and welded it back to the frame cross-member giving more space for the radiator hose to fit on the radiator outlet...sorry not best pic...
Also got my fabricated top of battery hold down in place and it seems like its going to work well...fans shroud clears everything nicely...
Exhaust has been put back on on the driver side (was removed to create more access space for the MC) and the brake light switch wired (but not tested)....coolant added...its ready to start up but can't go anywhere until tires come and get mounted....Tires might come in today....
___________
James Orofino
1970 CJ5
1958 Willys Wagon
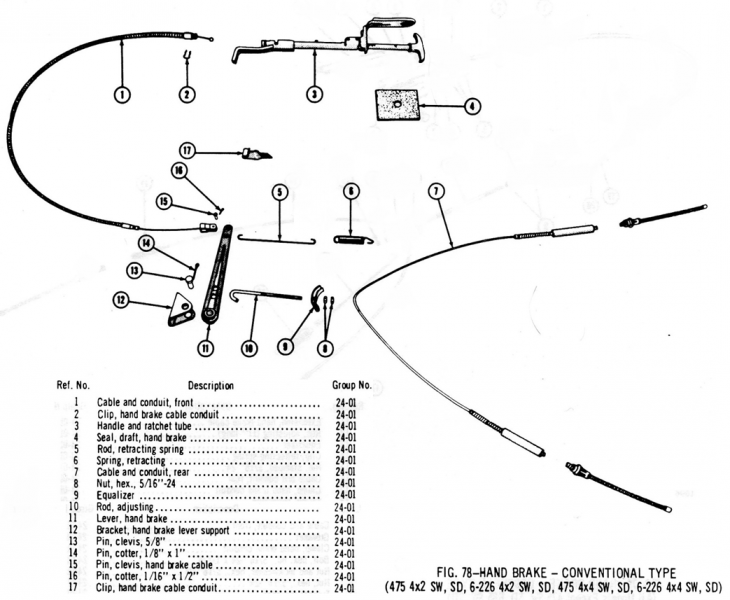
While waiting for the new rubber to arrive, I decided to try and make the e-brake/parking brake functional....Most early cjs have a transfer case mounted drum brake, but the wagons and trucks had cable pulls to activate the shoes on the rear drums. Since I had the rear brakes apart,I knew all was good inside the drum - just needed to figure out the cable pull system....There were 3 different cable brake systems on wagons, and this is the one my 57 has - its a two cable system: the upper cable is connected to the T-handle in the cab, and that activates a lever with mechanical advantage that pulls the lower cable that goes to the brake shoes.
I knew something was broken in the upper cable as when the handle was pulled, nothing happened. The upper cable has a retention ball that fits into the sliding pull handle, but the cable was broken at that ball.
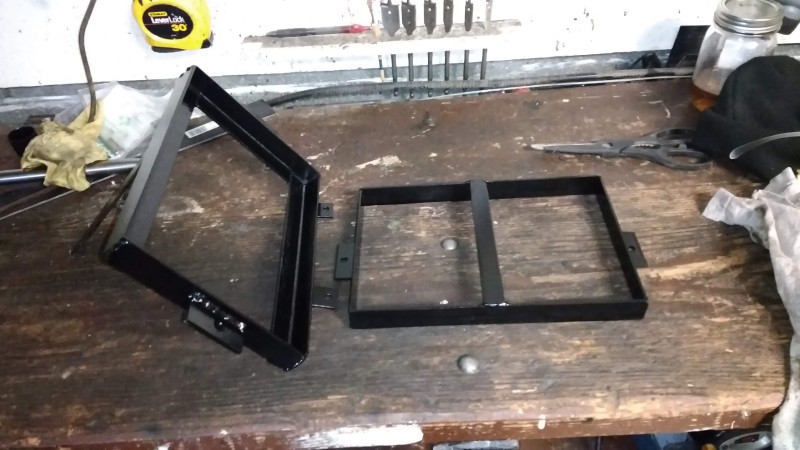
Here are the lever, pivot, equalizer etc all cleaned up, painted and ready to reinstall...I intend to re-use the existing lower cable that goes into the drums.
While I was under there trying to find the cable clamp on the transmission cross-member - there is so much grease/dirt and gunk that trying to scrape away inches of sticky gunk (and not for the first time) finally broke me down and I decided to pull the cross-member. It has been abused and the front lip was so bent back that it is essentially impossible to reach the nuts. So after some creative determine 'will get this effing thing off' work, I cleaned the 20lbs of oiled dirt off and bent the front edge back enough on the passenger side to allow access to all the mounting holes. Not sure if I am going to work on the other side or not - but the folded back part doesn't cover any mounting holes. The sad part is this is the 'after' photograph...its not pretty but it will work.
Finally - this allowed me to get to the D18 torque mount and bushing....add a new rubber bushing mount to the parts list...This was also motivation for removing the cross-member as I could see the bolt was loose but no way to access it with out removing the cross-member...
Here is the cross-member re-installed with the new transfer case torque mount...doesn't look like much, but lots of hassle getting that cross-member back in place with all the bolt holes lining up.
Trying to get the lower cable system finished up - but had another unexpected road block with that - more to come on that later. Of course, during this time working on the e-brake, the new tires arrived and have just been sitting in the corner waiting to roll....
___________
James Orofino
1970 CJ5
1958 Willys Wagon
I've never been disappointed in something I have bought from Walck's, but I was a bit this time...For many common use and replace parts, I try to get my stuff from summit or FLAPS as the prices are better. Walcks generally ask high prices, but when you can't get some unique items its usually part of the price and they have always been helpful and very timely with fulfilling orders and fast shipping (actually, I sometimes wish they had a more budget shipping option), and the fit is right and the part is exactly what I expected. But this time I ordered a 'new' upper cable for the e-brake system....and I received what I think is either a lightly used salvage piece (with yellow tag), or possibly a 'rebuilt' or 'new' piece that had then been left on a shelf for years and rusted....Its not a big problem - some wire brush/wheel and some sanding its mostly cleaned up, but it certainly didn't feel like 'new reproduction' as I felt it was advertised (Cable Hand Brake Front T Handle 1954-1959 Station Wagon, Sedan Delivery).
What I received had no rubber housing around the cable sleeve, and rusted ends...as said above, not a huge issue, just a bit disappointing...After I opened the package, I left the cable on the table and when my wife saw it, she assumed it was the broken one I took out and asked what was broken...
Anyway, its all cleaned up now, and I put a touch of paint on the ends so they don't rust again (was probably just a bit of flash rust when in storage?)....the end ball is all that was broken on mine - I probably should have tried to see if I could just get the inner cable with ball end....I might still and try to salvage it for a back-up or pass along to someone who could use it.

___________
James Orofino
1970 CJ5
1958 Willys Wagon
What's FLAPS stand for again?
?
Local
Auto
Parts
Store
??
Friendly ?

Spieg (May 1st, 2020)
Some say 'friendly' - some prefer 'favorite'....
___________
James Orofino
1970 CJ5
1958 Willys Wagon
Jim (May 1st, 2020)
Made a few steps forward...and then another hiccup...
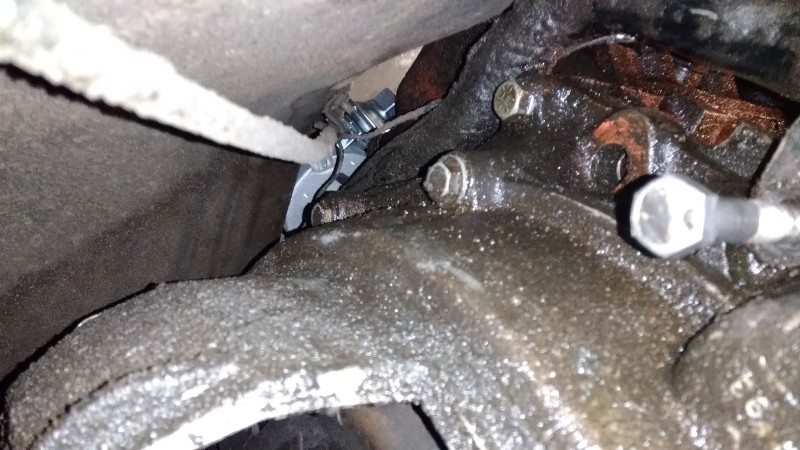
Made a bracket to hold the lower e-brake cable and welded it to the frame - tried to mimic the one that is still on the driver side.
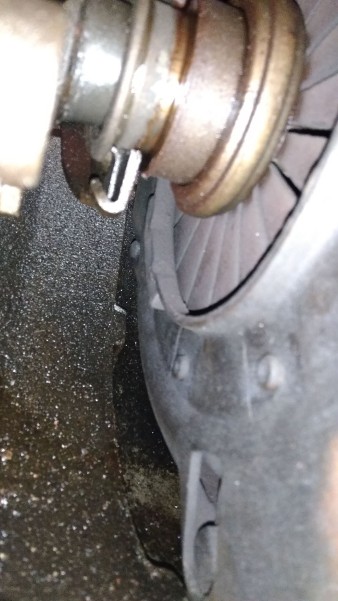
Got all the e-brake pieces (pivot arm, equalizer etc) mounted up, and got the T-handle assembly in the cab all set....But the upper cable I ordered is too long. Its not really that is too long, its that the inner cable is too long relative to the sleeve. The sleeve clamp is supposed to mount on the cross-member, but that leaves way too much wire sticking out the sleeve to operate the e-brake pivot arm...It need about 4-6 inches of the wire cut off, but I could not figure out if there any way to add the 'stop' that is on the end of the wire with no special tools. he pic is on the one I am removing - has the broken off ball on the other end - but you can see the PO kinked the wire up as it was pulled through and tied off on itself. I thought that was weird when I removed it, but now I know the PO was just trying to shorten the cable.
Obviously, I could mount the end of the sleeve farther away from the brake arm, but there are not a lot options in front of the cross-member - i could possibly mount it to a bellhousing bolt or something, but nothing is anywhere close to a good solution. Maybe a local shop shorten my cable, or possibly use some cable clamps - but I think I found a different aftermarket replacement option - more money spent but see what happens.
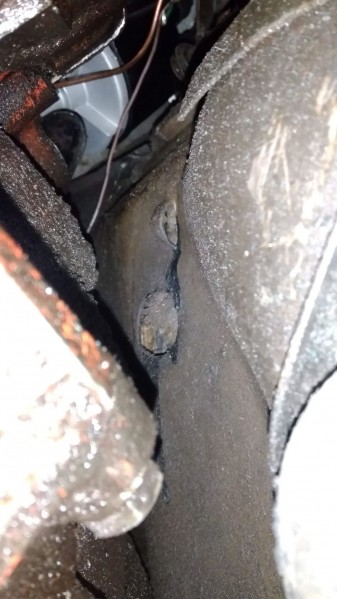
So tied everything up out of the way as wanted to get it out on the road on sunday for a bit of brake-test, and you really don't need a parking brake (especially when you aren't sure if the regular brakes are going to work). I've been chasing a bad oil leak since I got this thing...it comes from somewhere along the back of the engine, and with the firewall squeezed up so tight its hard to see whats back there. Anyway, I took it for a quick brake test drive around the block and when I got back there was oil dripping out everywhere along the back of the engine and bellhousing....I've thought quite a lot of it was due to struggles with the old school oil filter canister and then the oil filter adapter - which was a big problem - like it used to make a puddle of oil in a few minutes of idling. Now its just a few drips every minute. Its been hard chasing the leak as the entire engine block is covered in oil and its been hard to clean it with all of the self service car wash sprayers closed, but I did a bunch of hand cleaning when under there with the brakes and think I was able to track it to the back of the valve cover - especially on the rear driver side cover....When removing the covers, the cork gaskets were dry and cracked....I think this is the one that was most responsible for the biggest leak, but other areas are certainly seeping:
This is where I think the worst of the leak was coming from - back driver side corner of the driverside valve cover:
the valve cover that goes in that corner (had other gaping cracks as well):
The passenger side also had lots of cracks - but they were on the high ends so not as leaky:
So cleaned up the valve covers and shot some left-over high temp paint I had sitting on the shelf - silver is all I had (was originally used for exhaust manifolds). They are currently curing in heat (BBQ grill)....

___________
James Orofino
1970 CJ5
1958 Willys Wagon
Even after redoing the valve covers, I had a lot of trouble with oil leaking during a couple short test drives....and not just an annoying drip, but enough that it renders it undriveable (say a quart in 100 miles or so)....so I did some searching...removed the front cover on the bellhousing and inspected the engine side of the flywheel - it doesn't seem like its coated in fresh oil that would be leaking past the RMS or the plugs mentioned above...And just for fun, I stuck my camera into the inspection hole on the passenger side of the bellhousing behind the clutch and tried to get a pic - hard to say if that is a big oil problem, but it just looks like a old, leaky engine - not a catastrophic oil leak:
I also removed the starter, the oil filter and the oil filter adapter (mostly to remove the front bellhousing cover) and that provide a bit more access. This is looking up along the passenger side of the bellhousing along the rear of the engine - this is one of the oil pathways I think and makes a puddle on the right below the road draft tube:
Here is a pic up the drive side bank where the freshest path of oil is that also creates a decent puddle dripping off the left bottom edge of the bellhousing. The driver side toe board/firewall is to the right, the rear of the exhaust manifold is across from the bolt end, and the top of the orange block is the outer rear corner of the valve cover. How much oil can you leak out of the VCs?
And finally, looking further up towards the center of the back of the block again from the driver side - the camera is placed in front the through the floor brake pedal looking up back in there....you can see the bottom of the distributor with the black road draft tube and the oil pressure line that goes to the fitting there as well...
All of this led to removing the valve covers, distributor (which has to be taken apart in 3 separate pieces to remove while I climb on the front bumper and then lay across the intake manifold - stupid rear mounted chevy distributors! - made worse by an engine swap that has a firewall notch to fit it), coil bracket, carb, intake manifold, oil pan, oil pump, rear main seal, oil filter and adapter piece. Most things looked pretty good, but here is the rear intake gasket....definitely part of the problem. There is also an oil pressure line fitting back there as well that cannot really be accessed without removing the intake - so that got checked and tightened up just a bit....the road draft tube also appears to be leaking (although its not a high pressure oil zone) but no idea how to fix that.
Last fall, I couldn't see the rear gasket when installing, but I know the front one wanted to keep 'squeezing out' as it was tightened down - was really hard to evenly tighten down, and even then, the get the bolts to torque spec seemed to squish the front gasket out - looks like the rear suffered as well....No end gaskets this time, just an RTV bead and the side fel-pros. .
But starting all new with replacement everything...and I think I am going to go back to using Ultra Black as my RTV of choice. So I am back to where I was 8 months ago with the oil pan off, the oil filter adapter off, the carb off, the distributor out, the intake off and add in the valve covers are off....that should about cover it right. Any reason to pull the heads at this point.... I am going to redo all gaskets including the oil filter adapter gaskets....don't know that I will do them any better than I did last time but it can't be worse (hopefully).
___________
James Orofino
1970 CJ5
1958 Willys Wagon
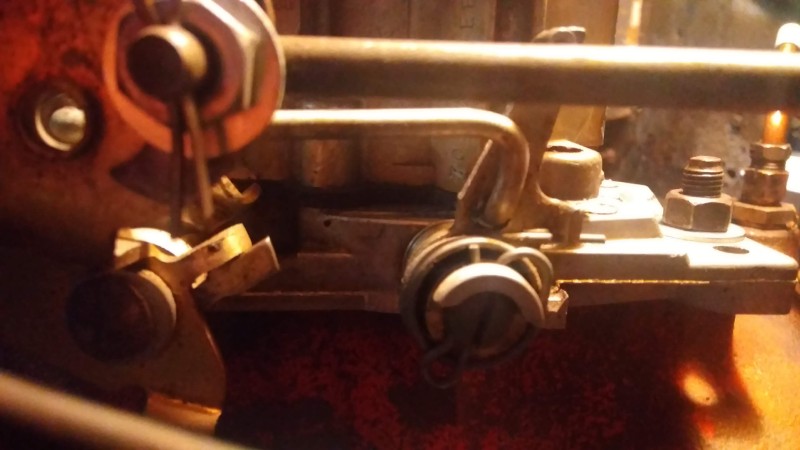
Almost done getting stuff back together, but took a little side-trip this afternoon....I inspected the carb (it was off the manifold) to see if I could figure out any linkage or mistakes I made during the rebuild - it just doesn't feel like its ever opening up the secondaries. Now, I've never driven a quadrajet (or even a 4 barrel carb I don't think), but my gut feeling is that when those much bigger secondaries open, it should be noticeable. First I noticed for what little driving its seen, there was already quite a bit of varnish and gunk building up - especially around the secondary choke plate and butterfly - it was a bit sticky as if it hasn't been operating. When moving the throttle linkage, there are two tabs - as the throttle linkage opens, the upper tab moves down until it pushes on the lower tab. As the lower tab moves, it is connected to linkage that opens the secondary butterfly.
On the bench. all seemed fine, but when I put it back on the manifold and connect the pedal linkage....The throttle was bottoming out just about the time the upper tab hit the bottom tab - and thus the secondaries were never opening...Here it is with the gas pedal floored - the two tabs just touching, but the bottom tab has not moved.
I thought I was going to have to figure out some changes to the gas pedal to allow for more travel, but then through some internet research, found that the quadrajet has different mounting locating for the pedal linkage.....In the case of the one I have, it has 3 positions represented by the 3 holes....The pedal linkage was in the middle hole. As the throttle rotates the mounting holes on an arc, the same amount of pedal movement can create different amounts of throttle rotation....So I moved the pedal linkage to the lowest, innermost hole, such that it will cause more rotation.
Now it allows for the the upper tab to move into the second tab and continue moving to open the secondaries, all with the same pedal range of motion. It will also make the gas pedal a bit more sensitive to subtle changes, but going to give it a try. I might even get the return spring out of the uppermost throttle hole and down to its appropriate mounting location on the bottom-most tab and run it towards the firewall - possibly using the coil bracket mount. So we'll see if it'll open up and go when the pedal is mashed!
___________
James Orofino
1970 CJ5
1958 Willys Wagon
Trying to address the overheating issue...the mechanical fan is not effectively placed or spaced from the radiator, and building a shroud for it seemed challenging given the off-center aspect....so a SPAL electric fan is going to be the solution hopefully, but that will require an upgrade to the electrical system as the electric fan will pull almost 19amps. I also wouldn't mind upgrading the windshiled wipers to an electric motor as well, so increasing the electrical capacity from the 30amp externally regulated generator to an internally regulated 60 amp (10SI) alternator will have to be part of the deal.
So started with figuring out how to mount the alternator....Decided to modify the existing homemade bracket that mounted both the PS and generator so I could swap the alternator in for the generator....
Used on of these F-brackets to mount on the exhaust manifold:
Then had to modify the lower portion of the homemade PS bracket...went from looking like this:
to looking like this:
Final set-up - using a 3 wire, 63amp 10SI....hopefully that is enough as the fan will pull 18-19A alone, but nothing else other than standard ignition, headlights, heater fan and maybe eventually, electric wiper motor:

___________
James Orofino
1970 CJ5
1958 Willys Wagon
FANTASTIC!! That was QUICK action on the issue.
Jeeping Thursday must have cleared the mind!
FINOCJ (May 30th, 2020)
The bracket was a bit of a hack job, but if it works....wiring the details next, maybe a fuse box. Will need to figure out mounting the fan and the thermostat sensor...long way to go still, but it's a start.
___________
James Orofino
1970 CJ5
1958 Willys Wagon
FWIW - this is the heater hose water temp sensor fitting I have:
https://hesco.us/products/30790/cool...r-hose-fitting
Not inexpensive - but it does what it's supposed to do (hold the sensor and not leak).
FINOCJ (June 1st, 2020)
wondering if I could use something like this under my thermostat housing...
https://www.jegs.com/i/Meziere/680/WN0028U/10002/-1
___________
James Orofino
1970 CJ5
1958 Willys Wagon
I like it!
I'm guessing clearance issues between the 'spaced out' t-stat housing to the fan blades won't be an issue with an electric fan, no?
I like the location better than the heater hose location. Clearance concerns for the temp sensor - it'll fit / won't be too wide of a diameter or be blocked by some other nearby part?
 Posting Permissions

 Reply W/Quote