Front Range 4x4 Upcoming Trail Runs - Add a New Trail Run

Results 1 to 11 of 11

Thread: 1985 Toyota Alternator Upgrade.

  1. #1
    Join Date
    Mar 2008
    Member
    #15
    Last Online
    February 29th, 2016
    Location
    In my shop
    Age
    40
    4x4
    1985 4Runner
    Posts
    1,876
    User Name
    4Runninfun
    Real Name
    Jon
    Thanks Given
    5
    Thanked 30 Times in 12 Posts

    Default 1985 Toyota Alternator Upgrade.


    On my list of things to get done on my truck has been to upgrade the alternator. Aside from the fact that the stock unit only puts out a very meager amount of amps, it is also very sensitive to water. And as such I have just recently killed by 4th. So I decided it was time.

    So I started my research. I came across this site, LINK Reading though his write-up everything seamed in order. And this would be the reference for my install.

    As soon as I saw the GM adapter for the 22-RE I bought it from trail-gear LINK

    I found the 47294 alternator from summit racing LINK

    Once everything was at my door it was time to start.


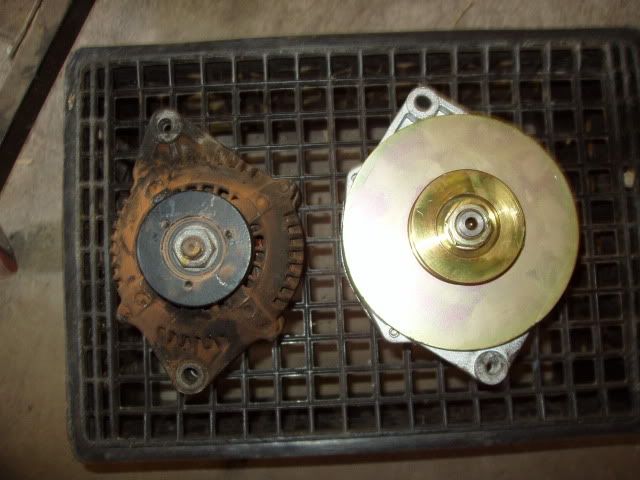
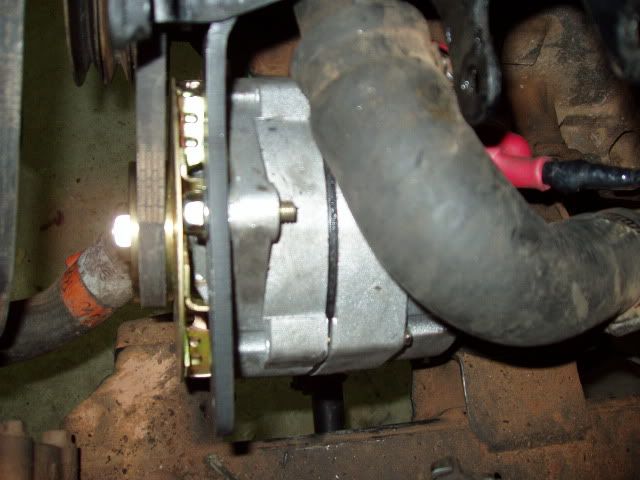
    First off the new alt is substantially bigger


    Then I made sure the mounting ears fit into the new bracket. Which it did. Only a small amount of wiggle room.

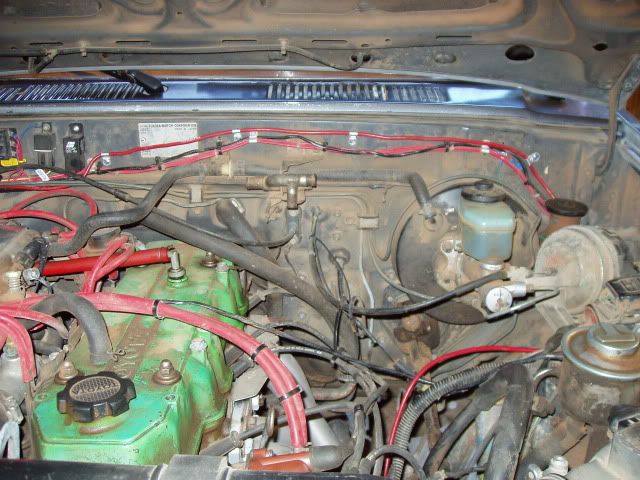
    Instead of pulling the lower radiator hose I pulled off the dist. cap and the power steering reservoir. I did this in order to give myself plenty of room to work and see to make sure everything lined up correctly.

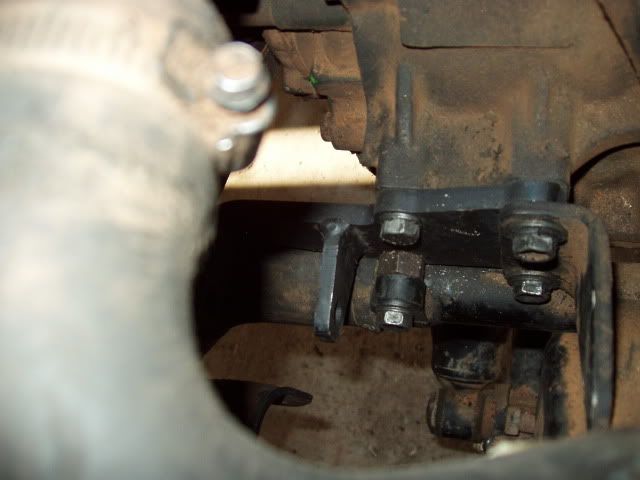
    Then I unbolted the stock alt. and installed the new lower bracket.


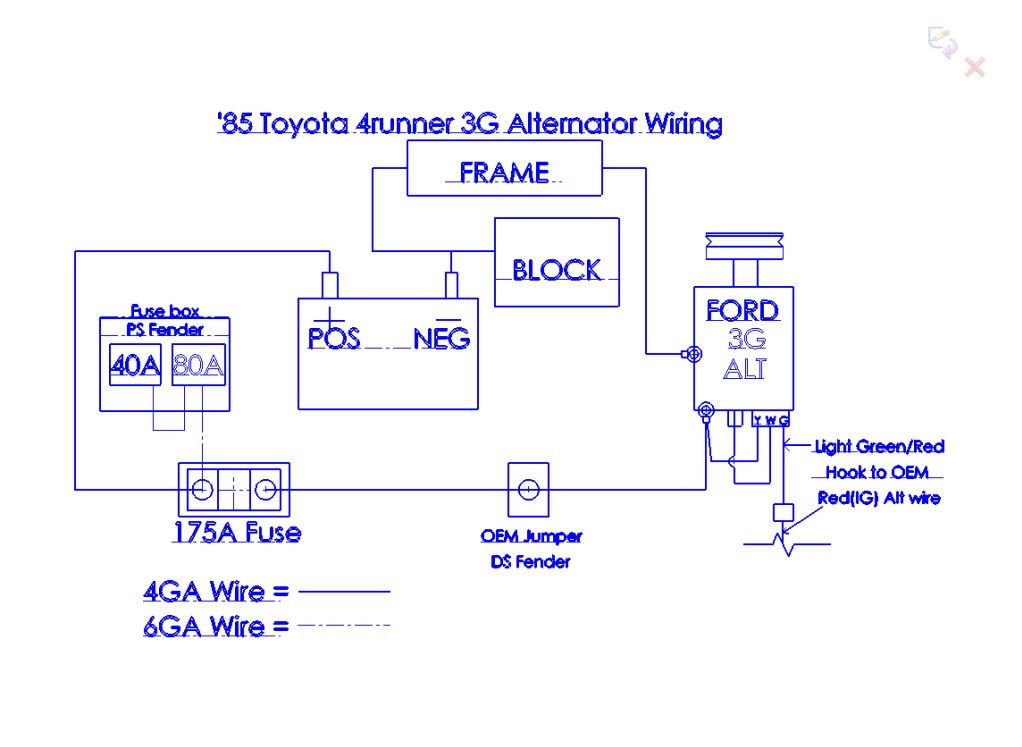
    Then while I had plenty of room to work I started mocking up some of the wiring including splicing into the stock wiring. I elected to make full use of the 3 wire setup. It is possible to use this alt as a one wire but I wanted to retain use of the stock charge light and volt gauge. All that is needed to do this is to separate the "L" wire (yellow) and hook it up to the "1" position which is marked on the HO (high output) alt. Then a small wire is need to go from the "2" position to the "B" post on the alt. From the "B" post a large gauge wire is run to the battery.

    Once I had most of the wiring sorted out I installed the HO alt and upper bracket and tightened it down. Everything fits! not much room to spare but that's ok.


    Replaced all the stuff I took off. And started the wiring at the battery end.

    The wire supplied with the battery is 8 gauge. Which is probably a little small but I decided to go ahead and use it and see how it works. I did need to go out to napa and grab another 4ft.

    I decided to run my charge wire along the firewall instead of along the core support in case I needed to access it.


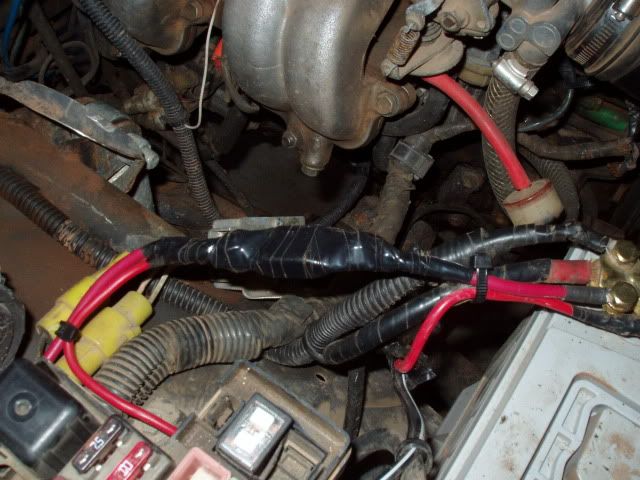
    The wire from the "B" post is run to a 175amp fuse. which is run to the battery.

    Now onto the wiring that needs to go into the fuse box that is located under the hood.

    Pretty simple first pull the black 80amp fuseable link and remove the stock wire that goes to the battery. *note leave the plate and just cut the wire. if you remove the plate you will find you don't have your headlights. Then move the wire that goes to the 40amp fuseable link to the downstream (fused) side of the 80 amp. Then run a wire from the upstream (unfused) side of the 175amp fuse to the upstream side of the 80amp fuse.

    In this picture you can just see the 80 amp fuseable link. Pull the wiring that is attached on the left side and move it to the right. Then run a wire from the charge wire to the left side.


    That's pretty much all there is too it.

    Right away I noticed much more power and smoother running. The small 8 gauge power wire got warm after a good high-reving test drive but wasn't hot so I will be sticking with it.

    A recommendation is to get the pigtail harness from summit for the HO alt. It will make your life much easier. I didn't but will be placing an order for one before long.

  2. #2
    Join Date
    May 2009
    Member
    #441
    Last Online
    July 14th, 2017
    Location
    Henderson
    Age
    45
    4x4
    '97 FZJ80
    Posts
    700
    User Name
    RidgeRunner
    Real Name
    Dave
    Thanks Given
    24
    Thanked 31 Times in 26 Posts

    Default


    Nice! Thanks for the write-up. This is on my list of to do's eventually.

    Sent from my Droid using Tapatalk

  3. #3

    Default


    just revving and hand checking the 8 guage wont tell you much, especially since there is only a minor load at anytime with normal accessories. you should take it to a shop and have the battery load tested to get that wire some full use and see how it is then. better to know now. nice write up by the way.

  4. #4
    Join Date
    Mar 2008
    Member
    #103
    Last Online
    August 9th, 2012
    Posts
    10,588
    User Name
    Brody
    Real Name
    Pete Brody

    Default


    From the Toyota Make and Model links in the TECH section on this forum:

    Alternator Rebuild /High Performance links

    Molly:I had my Toyota 3.0 Alternator rebuilt by Boyles Future Tech in California. My output at Idle went from 60 amp to 110 amp (Which was great with the winch, PIA's and rock lights) The cost 3 years ago was about $120, it is probably more now but Many Toyota folks have used them and I am pretty sure they do other brands.

    Boyle Future Tech
    12325 Locksley lane
    Auburn, CA. 95602
    530-888-6290


    http://www.fourwheeler.com/howto/86978/index.html

    http://www.rangerovers.net/repairdetails/altrebuild.htm

    http://www.crankshaftcoalition.com/w..._an_Alternator

    http://www.streetperformance.com/m/c...build-kit.html

    http://www.alternatorparts.com/

    http://www.aulro.com/afvb/technical-...r-rebuild.html

    http://www.toyotanation.com/forum/sh...ad.php?t=27270

    http://www.4x4wire.com/toyota/tech/alternator/

    http://www.ehow.com/video_4936007_re...r-brushes.html

    http://www.nationsautoelectric.com/index.html

    http://www.toyotanation.com/forum/sh...ad.php?t=27270

  5. #5
    Join Date
    Mar 2008
    Member
    #15
    Last Online
    February 29th, 2016
    Location
    In my shop
    Age
    40
    4x4
    1985 4Runner
    Posts
    1,876
    User Name
    4Runninfun
    Real Name
    Jon
    Thanks Given
    5
    Thanked 30 Times in 12 Posts

    Default


    Zukrider previously posted:
    "just revving and hand checking the 8 guage wont tell you much, especially since there is only a minor load at anytime with normal accessories. you should take it to a shop and have the battery load tested to get that wire some full use and see how it is then. better to know now. nice write up by the way."

    You are correct. However my point of going for a test drive and then checking the wire was merely to make sure that the wire could handle the current under normal operating conditions. Given the fact that the wire was warm I'm sure I'm loosing some current and will up the wire size probably this winter. I don't have a winch or anything more than some aux lights right now so I'm not too concerned... of course as we all know those are famous last words.

  6. #6
    Join Date
    Mar 2008
    Member
    #110
    Last Online
    April 6th, 2019
    Location
    Morrison, CO
    Age
    49
    4x4
    Toyota/Scout/Nissan
    Posts
    4,961
    User Name
    Patrolman
    Real Name
    Jeff
    Thanks Given
    182
    Thanked 346 Times in 298 Posts

    Default


    Nice swap! When I did my alternator upgrade, I went with the Moby-Arc 90 amp stator. At that time, it was the only version that was "bolt-in" as it keeps the same alternator but upgrades the stator. There was no kit to put in a GM version even though a few people had cobbled theirs together. The 90 is enough for what I do, so you won't be disappointed in this!

  7. #7
    Join Date
    Mar 2008
    Member
    #116
    Last Online
    July 27th, 2021
    Location
    Northglenn
    Age
    44
    4x4
    '85 Toyota 4runner - Speed Racer
    Posts
    377
    User Name
    4runner freak
    Real Name
    Danny
    Thanks Given
    2
    Thanked 3 Times in 3 Posts

    Default


    I replaced mine with a 130A alternator from a Ford Taurus. Easy to find in the junk yard for cheap and pretty easy to do.


  8. #8
    Join Date
    Mar 2008
    Member
    #15
    Last Online
    February 29th, 2016
    Location
    In my shop
    Age
    40
    4x4
    1985 4Runner
    Posts
    1,876
    User Name
    4Runninfun
    Real Name
    Jon
    Thanks Given
    5
    Thanked 30 Times in 12 Posts

    Default


    I looked at some of the welding alt's but they are pretty expensive. And since I bought a ready-welder last year I didn't need the added capacity.

    Nice taurus swap. How did you do the wiring on that one?

  9. #9
    Join Date
    Mar 2008
    Member
    #116
    Last Online
    July 27th, 2021
    Location
    Northglenn
    Age
    44
    4x4
    '85 Toyota 4runner - Speed Racer
    Posts
    377
    User Name
    4runner freak
    Real Name
    Danny
    Thanks Given
    2
    Thanked 3 Times in 3 Posts

    Default


    Here is a little diagram that I put together of the wiring.


    The biggest problem was realizing all the "jumper" wires coming off of the OEM wire going from the alternator to the battery, that are hidden in the loom attached to the front support.

  10. #10
    Join Date
    Mar 2008
    Member
    #15
    Last Online
    February 29th, 2016
    Location
    In my shop
    Age
    40
    4x4
    1985 4Runner
    Posts
    1,876
    User Name
    4Runninfun
    Real Name
    Jon
    Thanks Given
    5
    Thanked 30 Times in 12 Posts

    Default


    looks pretty similar. Always good to check out another way of doing something.

  11. #11
    Join Date
    Mar 2008
    Member
    #103
    Last Online
    August 9th, 2012
    Posts
    10,588
    User Name
    Brody
    Real Name
    Pete Brody

    Default


    Could we add the pertinent information to the Toyota make and model links stuff under the alternator thread?

Posting Permissions

  • You may not post new threads
  • You may not post replies
  • You may not post attachments
  • You may not edit your posts
  •  
BACK TO TOP