Actually, I have two grease guns and both have grease in them. Can't say if it's the right grease, though.


Actually, I have two grease guns and both have grease in them. Can't say if it's the right grease, though.

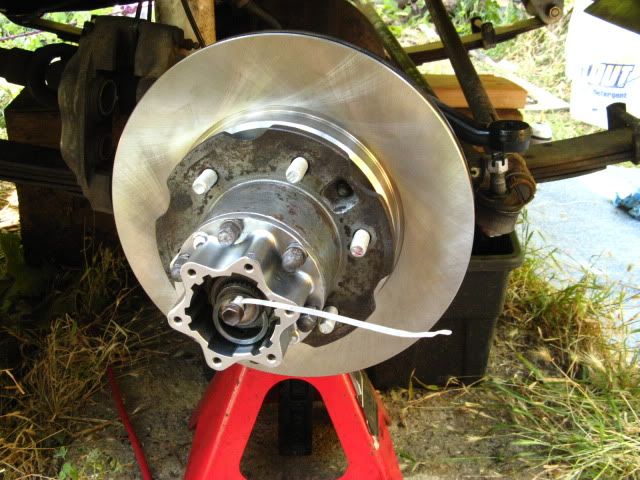
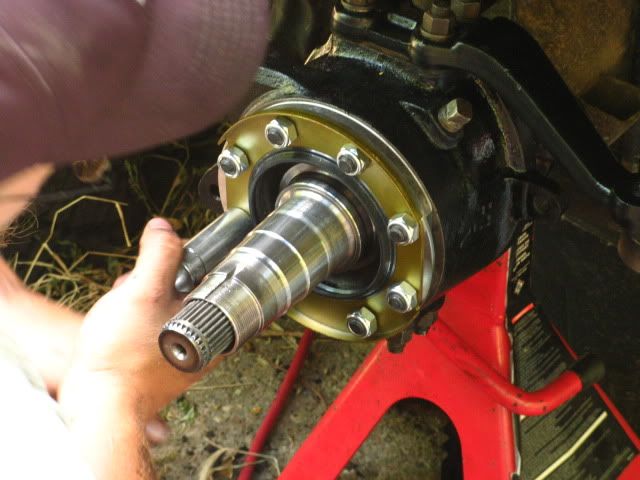
Looking good so far! Nice and new looking!
Anyone live by me and going over to Bruce's is welcome to stop and borrow a grease gun. Home from Ash and Karla's(and the dogs) in an hour or two..

Rob and Joe came over this morning to lend a hand with putting things together. Couldn't have done it without them.
The new wiper seal we couldn't figure out how to put on.
SST made out of an old tie rod for pounding in wheel studs.
Tightening things up.
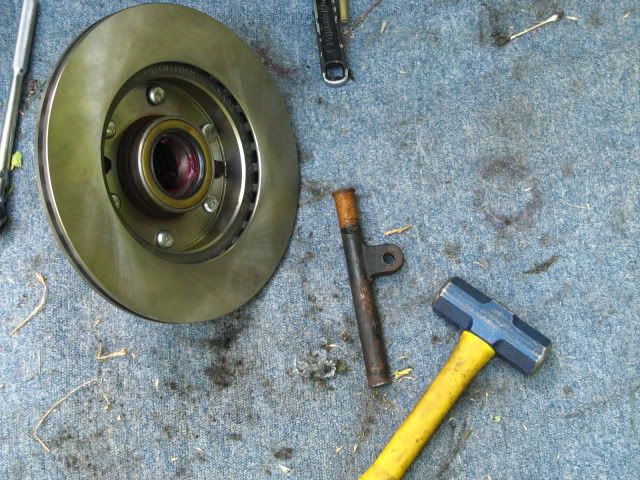
And the last SNAFU. Forgot the hub gasket so I had to take it off. Been trying to get this snap ring back on without snap ring pliers. I have the zip tie to hold the axle with my teeth. But getting the ring apart has been a PITA. Hopefully I can get it back in and the brakes squared away tonight.

the snap ring- find a socket that just barely fits or just barely doesn't fit over the end of your axle shaft. If you don't have one you can do it with a flat surface such as a flat piece of metal or a small chunck of 2x4. see where the end of the axle shaft tapers down at the end? put the snap ring on that surface, as much on the taper as possible. put the socket against it and hit it evenly with your hammer, the ring should spread and make it on the shaft.
if that doesn't work, put the snap ring in your vice with the open end up, and just the bottom of the ring opposite of the opening in the vice. Spread it using two vicegrips or whatever you can and put a big screwdriver sideways (or something) in the opening of the ring to keep it spread. carefully walk that out to the axle shaft without it popping off the screwdriver and see if you can't slide it on.
another thought, remember the way the old seals from the back of the knuckle came off, they were a bigger ring that had an opening and you had to twist them a little- I wonder if you could put the snap ring on the end of the shaft and put one end over the shaft by twisting it, then the other?
Well I got the ring back on.
But now it's thundering and pouring rain. Brakes will have to wait until tomorrow. This will give me a chance to order a caliper rebuild kit from Checker.
dude, your calipers are fine. dont rebuild them. it may cause issue you would otherwise not have. it was nice to meet you, and im glad i could help. hats off to Rob, he was the hero of the day!
x2 on don't rebuild the calipers- if they're fine leave them, and if not just buy a rebuilt one, they are a PITA to rebuild and not too muchof a savings to do it yourself. it also opens up the whole bleeding can of worms which is super fun by yourself. the front calipers both looked fine to me and were functioning when they came off, as did your pads and rotors (althought I do get the wisdom of replacing the rotors while it's all apart). I'd put them back and run it, see how it feels before rebuilding them. they're easy enough to revisit later anyway, two bolts and the pins and you're there.
the pics from today look great, you did a bang up job cleaning / rebuilding it!
What Joe said on the calipers...
Sorry I didn't get you call earlier which was probably about the snap ring issue. I was working and making too much noise to hear the phone.
I just use two small flat head screwdrivers to get the ring back on and have never had any problems doing it that way. I also use the same two small flat heads to take them off.
Glad to hear that it got fixed fine. Looked to the west and wondered how you guys were doing. Looked really wet....
The caliper rebuild doesn't really involve much. Just new o rings for the pistons. Don't have to take the caliper apart.
wow.. how did I miss this thread..... Well, if anyone else attempts this I would be happy to help, and I have all of the tools(drifts, sockets, scales etc) This was the first thing i did with my rig. Man I wish I would have seen this, it would have been nice to have an excuse to take a break from school work...


My apologies for bailing on you guys leaving you w/o my supervision though it sounds like Rob covered for me quite well. Barb & I took off Thursday for Buena Vista to test our "new" popup and things went so well we just got home today.
___________
Chris in Florida

Hopefully when i tear into mine this next month things will go as smooth as yours did
Just got back from a test drive. Got the brakes back on and torqued the lug nuts and hubs. Did some parking lot circles in both directions and everything seems fine. The annoying "tink" noise I was getting whenever I tapped the brake pedal is gone.
It definitely feels "different". Got home and retorqued the lug nuts and gave everything a once over. Tomorrow on lunch break I'll tighten down everything again. I will need to find a good method for pumping more grease into the knuckles. I only put 2 quarts of fluid in the diff. I wanna mix up some of the remaining sludge, drain it and refill later this week.
I bet it feels different! Probably better than new with all the high-end parts you got.
we ended up using two screwdrivers to take it off... but it was a really butch minute or two, can't really say there was any technique to it, we just spread the ring and shoved the screwdrivers under it until it popped. pretty sure there was some hammer in there too. I'd love to refine that, how do you do it with the screwdrivers?
OK, I'll try to explain it where it makes sense as I just did it on my heap yesterday when I replaced the rotors and pads.
The screwdrivers are small, both about the size of ones you would work on computers with, and are flat heads. I take the edge of one, slide it into the spline on the axle near the opening of the snap ring. I get it under the ring where I can raise the ring a little, and slide the other under the ring. With a little finesse, you can then pop the ring off. Installation is more or less the reverse: tilt the snap ring onto the end of the axle shaft a little bit, slide one of the screw drivers under the higher side close to the open part of the ring, pry gently, and the ring should snap back onto the shaft. This is actually the harder part as there is a 'sweet spot' where this works really well.
I hope this explains it well enough. I have always had problems finding the 'right' set of snap ring pliers that will work in that tight space and hold well enough on greasy slippery stuff.
The bag idea is perfect. I was going to use a big syringe. A bag will work better I think.
I have a grease gun and am local, I use it to pump grease into my birfs which should be comparable. Hit me up if you would like to borrow, I am around all week.
Erik
 Posting Permissions

 Reply W/Quote
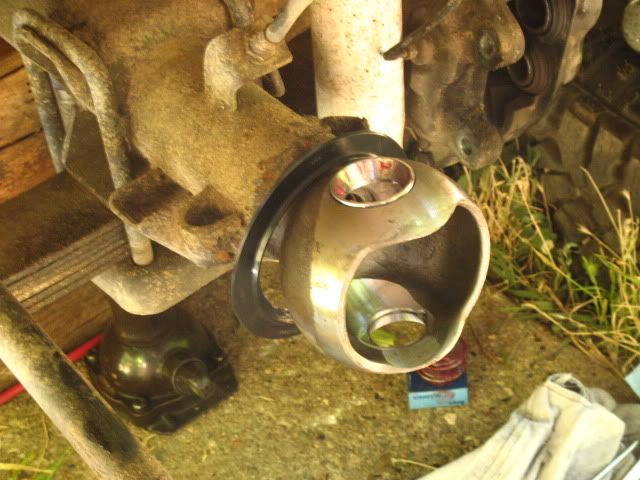
")