Well, since the first post(s) of this thread got deleted, leaving my post as the first, this post no longer made sense. So this thread is about what you did to your rig today!!


Well, since the first post(s) of this thread got deleted, leaving my post as the first, this post no longer made sense. So this thread is about what you did to your rig today!!


Well, since I managed to delete the main part of this thread and the posts are now somewhere in the ether, I guess I will post up my "mod", such as it was.
After replacing all the rubber under the hoods of two FJ60s and an old F250, all the hoses, all the vacuum lines, all the belts, cleaning out the fuel systems, carbs, IACs, TBIs, PCVs, replacing all the spark plugs, distributor caps and rotors, doing engine flushes, replacing the fuel filters, oil changes, and fuel system flushes, not to mention doing a complete "tighten everything", for three separate customers, I decided that I would finally get around to doing all this for myself as I was a bit overdue.
Most of the belts had been replaced within the last 4 months as well as all the hoses, so this was essentially done and only required a double check. The vacuum lines all got replaced, I cleaned out the TBI and IAC, replaced my fuel filter, PCV, cleaned the MAF, replaced the plugs, cleaned out the O2 sensors, etc. Now it is running nice and smooth again. There were also a few spots where stuff was rubbing that I thought that I had anchored or added an additional piece of hose to and I fixed these this time around. That prompted me to double check for any other rubbing issues that might leave me stranded, but there were only two places that I found.
I also took the time to blow out the diff vent lines to make sure that they were clear and to tighten up everything under the hood and the rest of the truck.
One of the things that I do when I replace hoses and belts is I mark the date on them with a silver marker. This gives a very quick reference anytime you look under the hood as to when all the rubber got replaced and when you should start thinking about replacing it again. It also gives you a heads up if a belt fails prematurely, so that you can look for anything that may have caused this. In addition to this, another thing I do where I can is to double up on the hose clamps. That gives you an extra set hoses clamps in the right size range and is an easy place to 'carry' them.
No pictures as it still looks the same under the hood as it always has....
I actually found the reason for the missing posts on this thread. There was a glitch in the moderator tools that was supposed to select all the posts in a thread allowing you to move the whole thread with everything in it. Turns out that when you hit 'select all' it only selected the topmost post of the thread, and when you moved the thread/post, everything else vanished into the ether. This had puzzled both Chris and me awhile back when the same thing happened to something else that was moved and we couldn't find the missing stuff anywhere. It also explains why Steve's(Scout Man's) post was the only one showing up even though I knew it wasn't at the start of the thread...
So, mystery solved and will hopefully be fixed by Aaron shortly especially since I am reorganizing the whole "Tech" part of the forum to make it more useful. When I get this done, Jock will organize a useful list to make things even easier to use.
So please continue to use this thread that ColoDisco started and re post stuff that you have done to your rig if you feel like it. It was looking to be a fun thread before I lost some of the posts....


Some of you may have seen this on Bill's Burb, which would be correct. Bill is redoing his set up and offered to sell me his old rear bumper. I recently had put on a rear bumper that was way to heavy and hung to low, so I picked this one up...... well a surprise to me it turns out that someone already paid for it for me as a Christmas gift..... Thank you again Keith....

Score! Looks good, Happy.
Sexxxxxxxxy
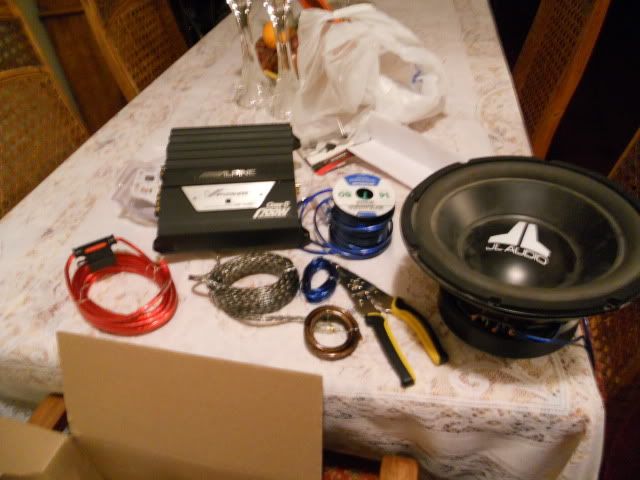
Working on the box this week. Hope to have it all done and installed by Friday.
Thanks to Pete for the Amp!
Noice. One day, ill put a sub in mine.
Took me about 3 years to start working on getting it in. Got it when I had my Honda and never had the money for an amp.
One day, ill put a sub in mine.
Matt-I have two subs, one a big one in a big box and the other an 8" in a small box. Give me a shout. I have no room for either.....
Thanks to Pete for the Amp!
Let me know if you have any problems with it!
Here is my mod for today. Its not done, obviously, but this was my test for what I intend to do for a paint job. I am pretty happy with how it turned out, so I will continue this on the rest of the rig sometime soon.
Also, I tore apart my new tcase today with the intention of removing the rods that prevent 2 wheel drive high in the front. Assuming I can finish tearing it down, and get it back together tomorrow I will re-mount it to the transmission, and hopefully put the new transmission in as well.


Looks good Steve, glad you're keeping the colors!
___________
Chris in Florida
thanks!! Yea, i think its the way to go. THe white is a pain in the ass to keep, but I think whens its all done I will be happy that I did!

Looking Good steve!!!!!

DUDE!!! Somebody stole the rust from your fender!!!
___________
The Lost Boys motto: We don't know where we're going, but we'll be there for awhile. :)
That looks really really good. Can't wait to see the whole truck done up in it. Care to share the details on what you did i.e. prep and what paint and such? May not be ready to do the Pebble Beach concourse event, but its damn good for driveway painting from an amateur. Might have to join you and do mine here soon too.
First off... dont be fooled, it doesnt look as nice from up close! But I am still happy with it.
Step 1: I took the wire brush to all the white parts, as it was extremely rusted out under the paint. Stripped it down to bare metal. I dont expect to go this far with most of the rest of the rig, as this was the worst, but I felt this section really needed it. I did not take the wire brush to any of the red paint.
Step 2: I lightly took a palm sander to the whole pannel. Not sure if it actually did anything, but it made me feel good. Then I wiped the pannel down with wax/dirt remover (basically acetone).
Step 3: I primed the whole pannel.
Step 4: I painted the enitre pannel red. This is backwords of how you are supposed to paint (should have started with the white), but I had good reasons to do it thise way, and it made my life way easier in the end. I had also tested to make sure the white would in fact cover the red, and it did no problem
Step 5: Next was to tape off the original design. Since I took the white down to bare metal, but not the red, I could still see the textural difference where the design used to be. I taped off the red stripe with electrical tape. I chose this for 2 reasons... 1 - it was the right thickness for the red line, and my painters tape was too wide, and 2 - it bends and stretches better for making curved designs. This part is tedious to make the curves look just right. I didnt do so well if you look up close, but I think the others will get better. I then also made the outside boarder in e-tape, then covered the rest of the pannel with wide painters tape (note, the HF tape is crap - it takes way too much effort to get the tape off the roll without ripping it).
Step 6: Spray the white paint. Did a couple good thick coats here to make sure it covered the red alright, although it wasnt that difficult. Then peel the tape!!!!
The Paint I used was Rustoleum professional grade spray paint. It is supposed to be tougher, and more weather resistant than their regular spray paint. Also came in a high-flow, any angle can which makes life a lot easier also. Its $5.00+/- a can at home depot. I really liked the way it came out and the way it covered. I did this whole pannel in maybe a quarter of a can of each. It is also quick drying.
Things I did wrong, but will fix for the rest of the rig: I really didnt wait long enough for the paint to dry before doing the next layer, and before taping. I managed to pull a little bit of the red off when I pulled of the tape, but I was rushing.
here was my other project today. I had to strip out my new tcase so I could make a true twin stick out of it. Took me a long time to figure out how to get it apart, but I managed. Getting it back together may prove to be a little bit of a challenge, but I'll manage.
1. I pulled all this
2. out of this
3. Just so I could remove these, then put it all back together again.
Looks good Steve!
 Posting Permissions

 Reply W/Quote